|
Guide to
Assembling a Computer: Choosing the Components
This guide aims to provide
simple and practical tips on how to choose the
components for building your own computer, even if you're
not an expert.
STEP 1: MOTHERBOARD
The motherboard
is the heart of the system, where all the other
components are connected. The first step is to choose
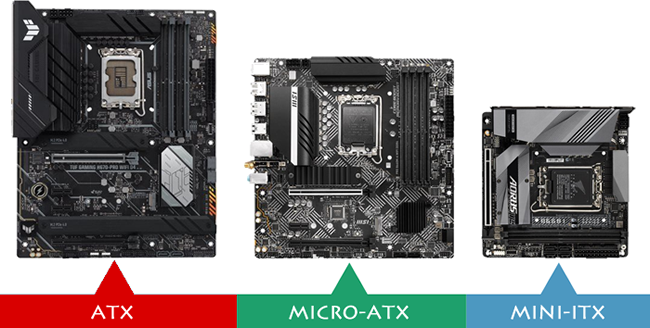
the form factor of the motherboard,
which depends on the size of the computer you want to
assemble. The main form factors are:
- Mini-ITX:
the smallest form factor, used for "mini PCs".
- Micro-ATX:
medium-sized, economical, and versatile.
- ATX:
standard form factor, with all connectivity options,
but bulkier.
What to check
on the motherboard:
- Processor
compatibility:
Check which processor models are supported by the
motherboard, typically listed on the manufacturer's
website.
- RAM:
Check the maximum supported RAM capacity, type
(DDR4, DDR5, etc.), and frequency (in MHz).
- Other
connections:
SATA for hard drives, USB ports, and PCI/PCI-E slots
for video cards and other expansions.
Guideline:
A Micro-ATX motherboard with 2 RAM
slots (DDR4), 2 SATA ports, 1 PCI slot, and 1 PCI-E slot
covers most common needs.
STEP 2: PROCESSOR
(CPU)
The processor
is the brain of the computer, handling all operations.
To choose the right one, consider the following
parameters:
- Number of
cores:
More cores = greater ability to perform multiple
tasks simultaneously.
- Frequency:
Measured in GHz (gigahertz), this indicates the
speed of the processor. The higher the number, the
faster the processor.
Guideline:
A 4-core processor is suitable for most
everyday tasks.
STEP 3: MEMORY (RAM)
RAM
is essential for the fast operation of the system. The
more RAM you have, the faster the system can manage open
applications and files.
What to check:
-
Compatibility
with the motherboard (capacity, type, and frequency).
-
Dual-Channel:
It's better to have 2 RAM modules of 8 GB each
rather than one 16 GB stick for better performance.
Guideline:
A 16 GB (2x8 GB) DDR4 RAM kit at
2666 MHz is a great choice for most
users.
STEP 4: CASE
The case
is the enclosure that holds all the components. Choose
the right case based on:
- Size:
For example, if you choose a Micro-ATX
motherboard, you'll need a case that supports this
form factor.
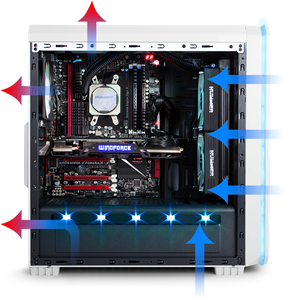
-
Ventilation:
Good airflow is critical. Look for a case with front
fans (to bring in cool air) and rear fans (to expel
hot air).
- Aesthetics:
Cases come in various designs, some with transparent
panels or LED lighting.
STEP 5: STORAGE (Hard
Drive)
The hard drive
is where your files are stored. You can choose between
two main types:
- HDD
(Hard Disk Drive): cheaper but slower.
- SSD
(Solid State Drive): faster and more durable but
more expensive.
Guideline:
A 240 GB SATA3 SSD is sufficient for
everyday use and ensures optimal performance.
STEP 6: GRAPHICS CARD
(GPU)
The graphics
card is necessary to display everything on your
screen. If you're not gaming or working with intensive
graphics, an integrated graphics card might be enough.
But if you're gaming or doing graphics work, you'll need
a dedicated graphics card.
What to check:
- Processor
frequency
of the card (measured in MHz).
- Number of
cores
(CUDA cores for Nvidia, Stream Processors for AMD):
The higher the number, the better the performance.
STEP 7: POWER SUPPLY
(PSU)
The power
supply is one of the most important choices. It
needs to provide enough power to all components without
wasting energy. Here's what to consider:
- Connectors:
Make sure the power supply has the right connectors
for all components (CPU, motherboard, GPU, etc.).
- Power:
Choose a power supply that provides enough wattage
for your system. A typical system requires at least
450W.
- 80 Plus
Certification:
Look for a power supply with 80 Plus certification
to ensure energy efficiency.
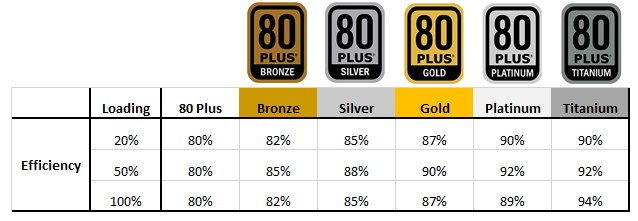
Guideline:
A 450W 80 Plus power supply is enough
for a system with a processor, RAM, 1-2 hard drives, and
a mid-level GPU.
Conclusion
By following these
steps and guidelines, you'll be able to choose the right
components to assemble your own computer. Take your time
to understand your needs, and if you have any doubts,
always check the specifications from the manufacturers.
I hope this guide has
been helpful. Happy building! |